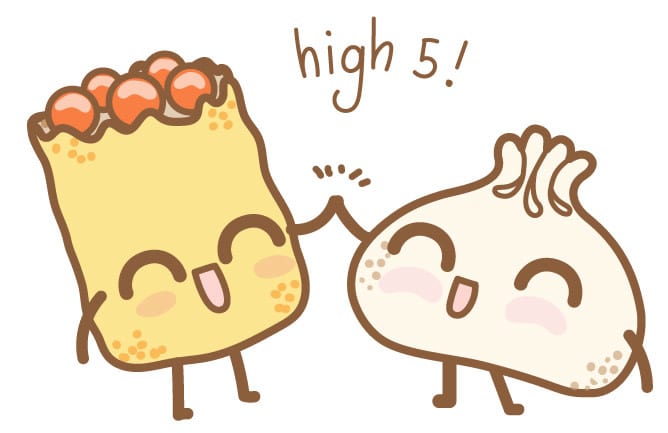
Adelyn Tam is a product designer and illustrator based in Kuala Lumpur, Malaysia. She was able to upload her dim sum-themed cartoon stickers to Apple iMessage in just over a week. In this tutorial, she shares how you can make your own stickers for iMessage. All you need is a set of sticker designs and your computer.
When Apple announced iOS 10, I was excited about the stickers on iMessage. Being a heavy iMessage user, when emojis weren’t enough to convey my thoughts, I would make a doodle, take a photo, and send it to the other person (what is a phone call anyway?).
I loved the idea of seeing some of my artwork being used in daily chat conversations and decided to give this a go. Here, I’m going to share my process from paper sketches to having the Dim and Sum stickers published on the iMessage App Store. This is my first attempt at self-publishing a sticker or iOS app (it’s the same process), and I’m sharing this from the perspective of a designer.
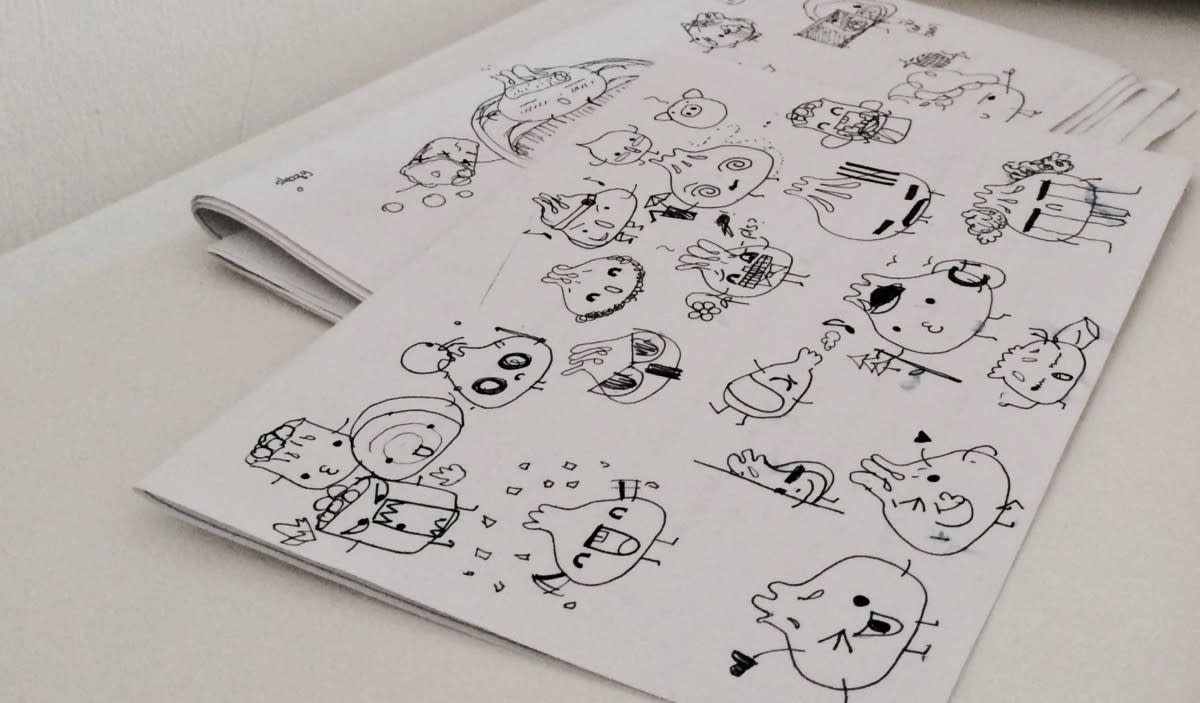
My process for the eight days in a nutshell:
Day 1–3:
Came up with a concept, sketched it on some paper. Used Illustrator to create digital versions of my sketches. Finished 24 stickers.
Day 4:
Downloaded and learned to use Xcode to create stickers. Signed up for an Apple Developer’s account, and did what seemed like about a thousand steps to get my stickers uploaded.
Day 5:
Finally uploaded my build for approval to the iMessage App Store.
Day 6:
App status changed to “Waiting For Review.”
Day 7:
App status changed to “In Review.”
Day 8:
Stickers got approved and are ready for sale!
Here’s how I prepared my artwork for iMessage.
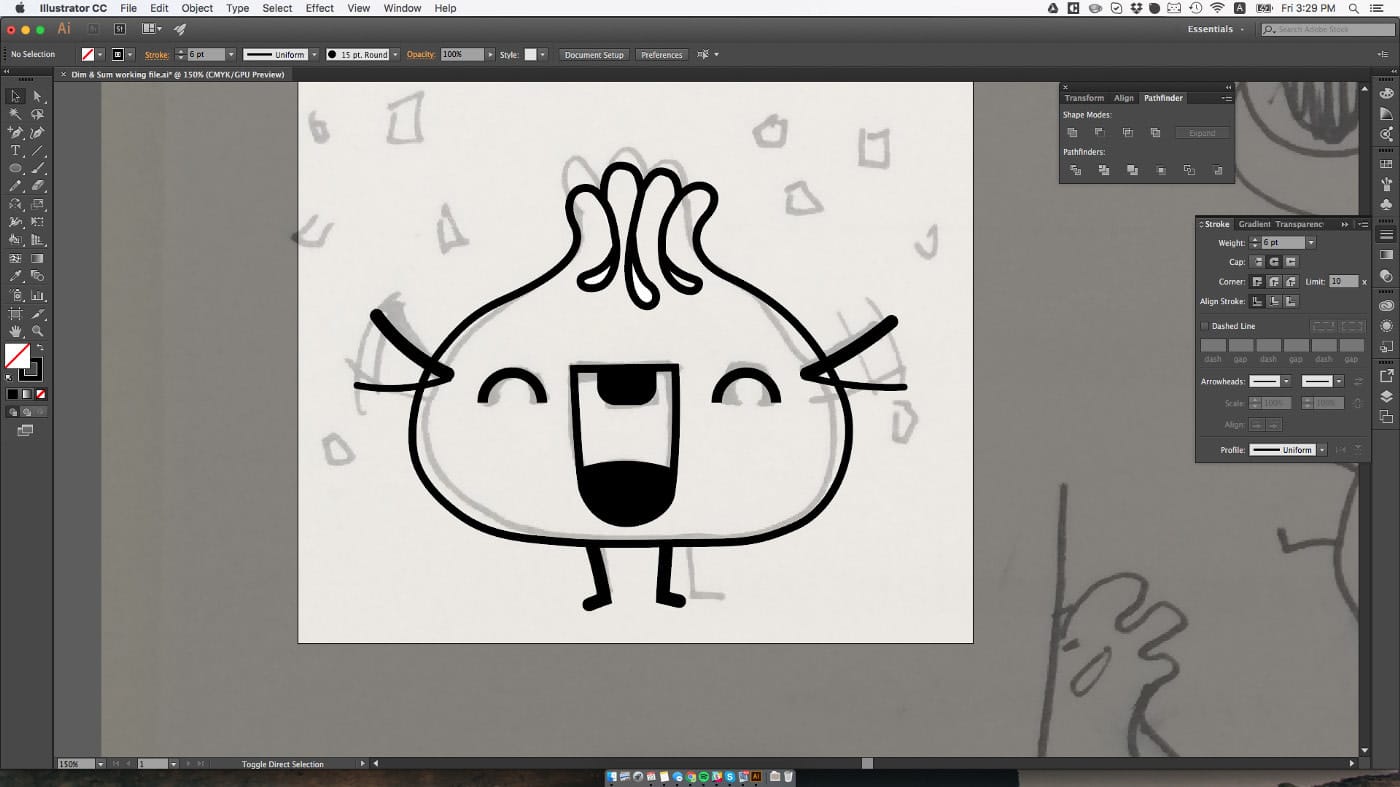
1. Prepare your stickers on Adobe Illustrator
I usually work with Illustrator when creating vectors. I will cover some basic things to note when preparing your Illustrator documents for stickers:
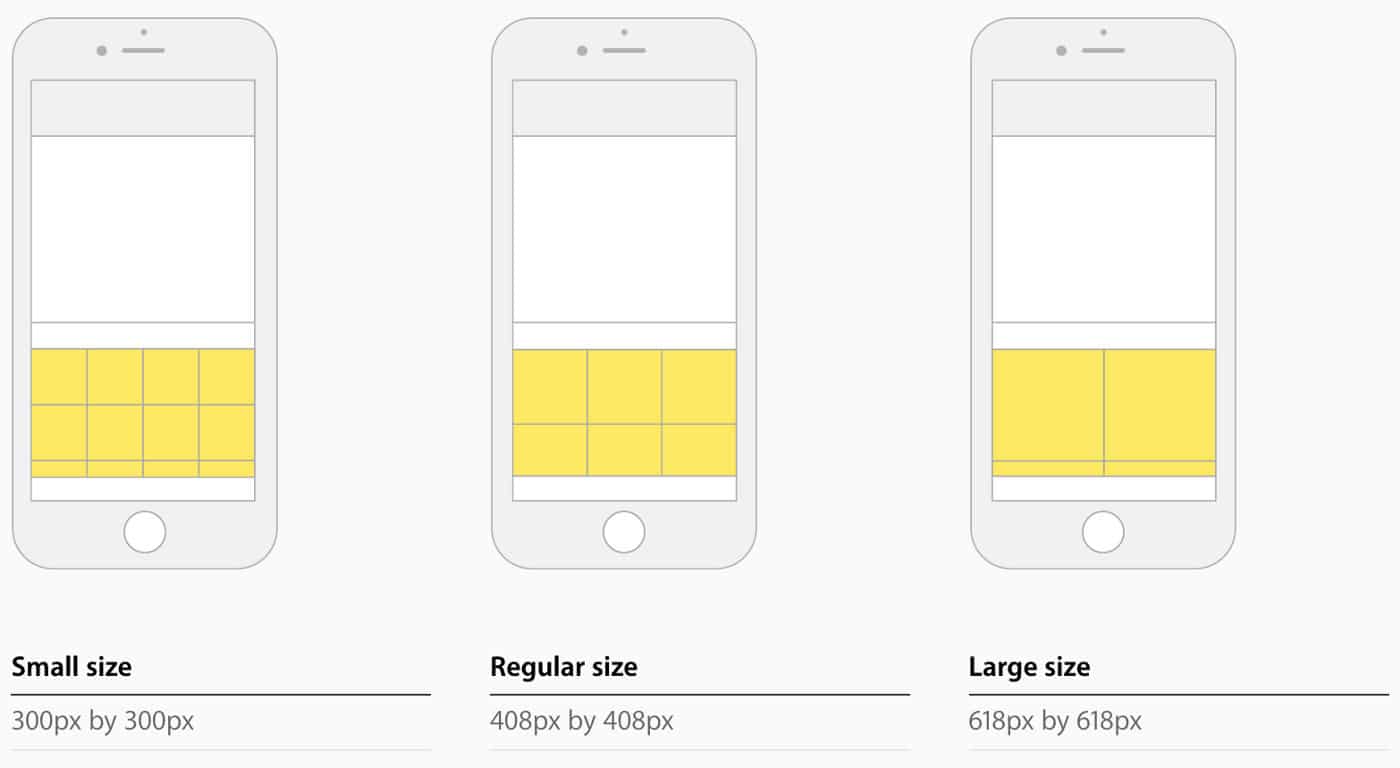
Know your sticker size. You must choose 1 of the 3 sizes later on in Xcode. So your artboard on Illustrator should be sized accordingly. Generally, the more detailed your artwork, the larger your sticker size should be. I used the regular size (408px x 408px) for mine.
Choose your size. This image is taken from the iOS Human Interface Guidelines.
Create separate artboards for each sticker. There are no set number of stickers (that I could find) for the iMessage store. So my guess is to go with a number that you think would appeal to users, especially if you’re selling them.
Remember that it’s a sticker set, so try to retain some level of visual cohesion across the different stickers.
Use the “Export for Screens” feature. Export as PNG, make sure your background is set to transparent, and @1x is enough.
2. Create your app icons
For the app icons, I chose to go with Sketch. Here’s a useful template that I found by michaellee on Github to generate the app icons on Sketch. In total, there are 12 icon images that you will need for Xcode, and one for iTunes Connect. Here’s what it looks like:
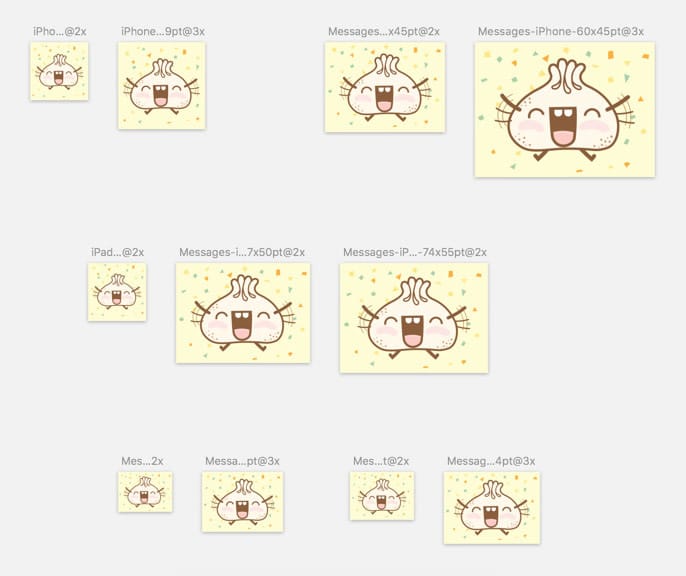
Some pro tips for creating app icons on Sketch:
If you’re copying your vectors directly from Illustrator, make sure you’ve converted your strokes into outlines beforehand. Because you don’t want some strokes to be too thick or too thin when you scale them to the various sizes required.
Set your icons as symbols. That way, when you are making your second sticker set, you only need to replace one image.
Export them @1x and place all in one folder.
3. Transfer your assets into Xcode
Now that you’ve got your assets ready, it’s time to configure them in Xcode , a tool for developing software by Apple. You can download it for free from the Mac App Store.
The process of getting your assets onto Xcode is pretty straightforward. You can watch it in this video. Basically, there are two parts to this: one is transferring your sticker artwork, and the other is the app icons.
The bulk of work from publishing the app comes after that, especially if you’re doing this for the first time like me. I will talk about setting up Xcode for your stickers, testing, and uploading it to iTunes Connect and the other nitty gritty stuff in the rest of this post.
4. Join the Apple Developer’s Program
Assuming you are not a part of the program yet, you will have to register to be able to distribute apps on the App Store. It costs $99 per year. The process is straightforward and acceptance is immediate. The only hiccup for me is I had to contact Apple Support to amend my full legal name (required), and that took about a day.
This part could be a deal breaker for some because it involves some initial investment, but, like what I always say to all Apple products, “Take my moneyyy!”
5. Set up your iOS certificates
You need iOS certificates to develop and distribute your stickers and apps. You will need two certificates: development and distribution. The certificates will last for a year.
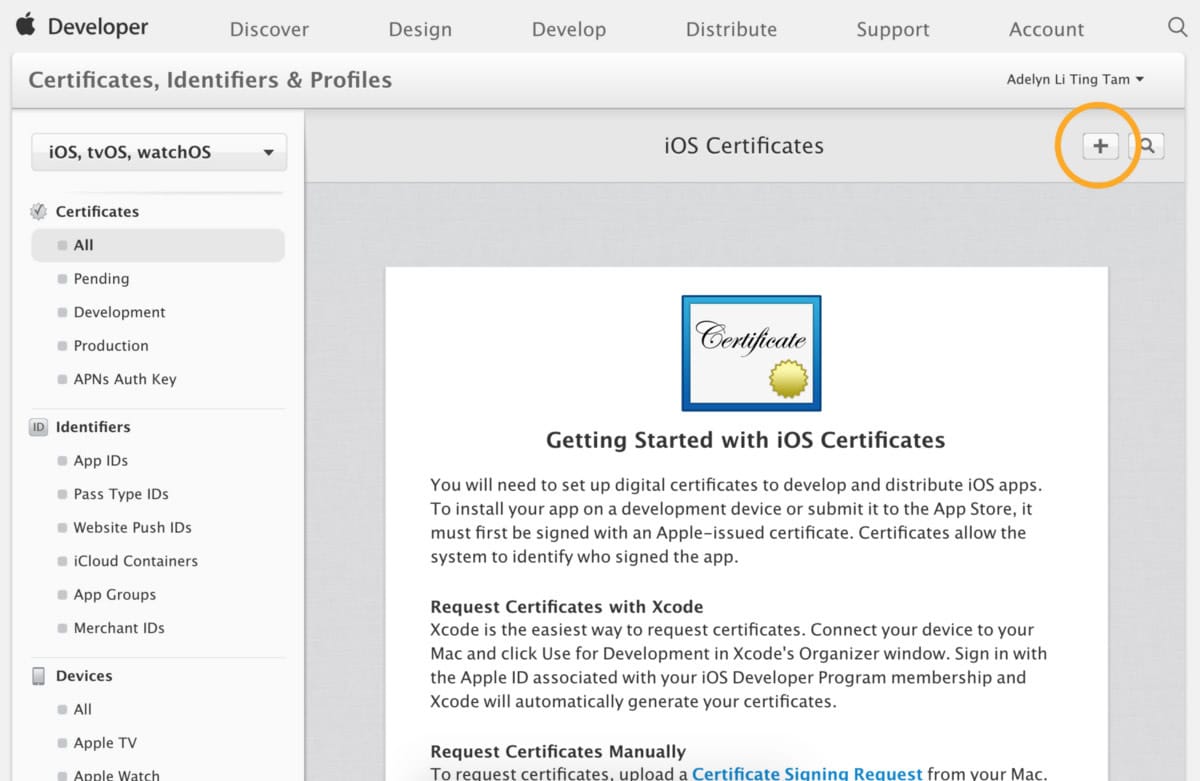
Click on the + button at the top to create a new certificate.
Once your developer account is ready, go to Account > Certificates, and you should see the image below. I’ve chosen to add my iOS certificates manually. Watch this great video guide to see how it’s all done.
The process will need quite a bit of clicking around but otherwise it is quite clear. I will briefly summarize the process in the video here:
Create a new certificate for production
- Click on the + button > Choose iOS App development
- Create a Certificate Signing Request (CSR) via Keychain Access.
- Upload the newly created CSR.
- Generate the production certificate, download, and install. It will now be shown on your Keychain Access.
Create another certificate for distribution
- Click on the + button > Choose App Store and Ad Hoc.
- You may use the same CSR as above.
- Generate the new distribution certificate, download, and install.
- You’re done!
6. Register an app ID for the stickers
You will need to register an app ID for your stickers. The same ID will be used later on in Xcode’s configuration. Here’s a brief walk-through:
- Go to Account > Identifiers > App ID > Click on the +
Here’s what mine looked like:
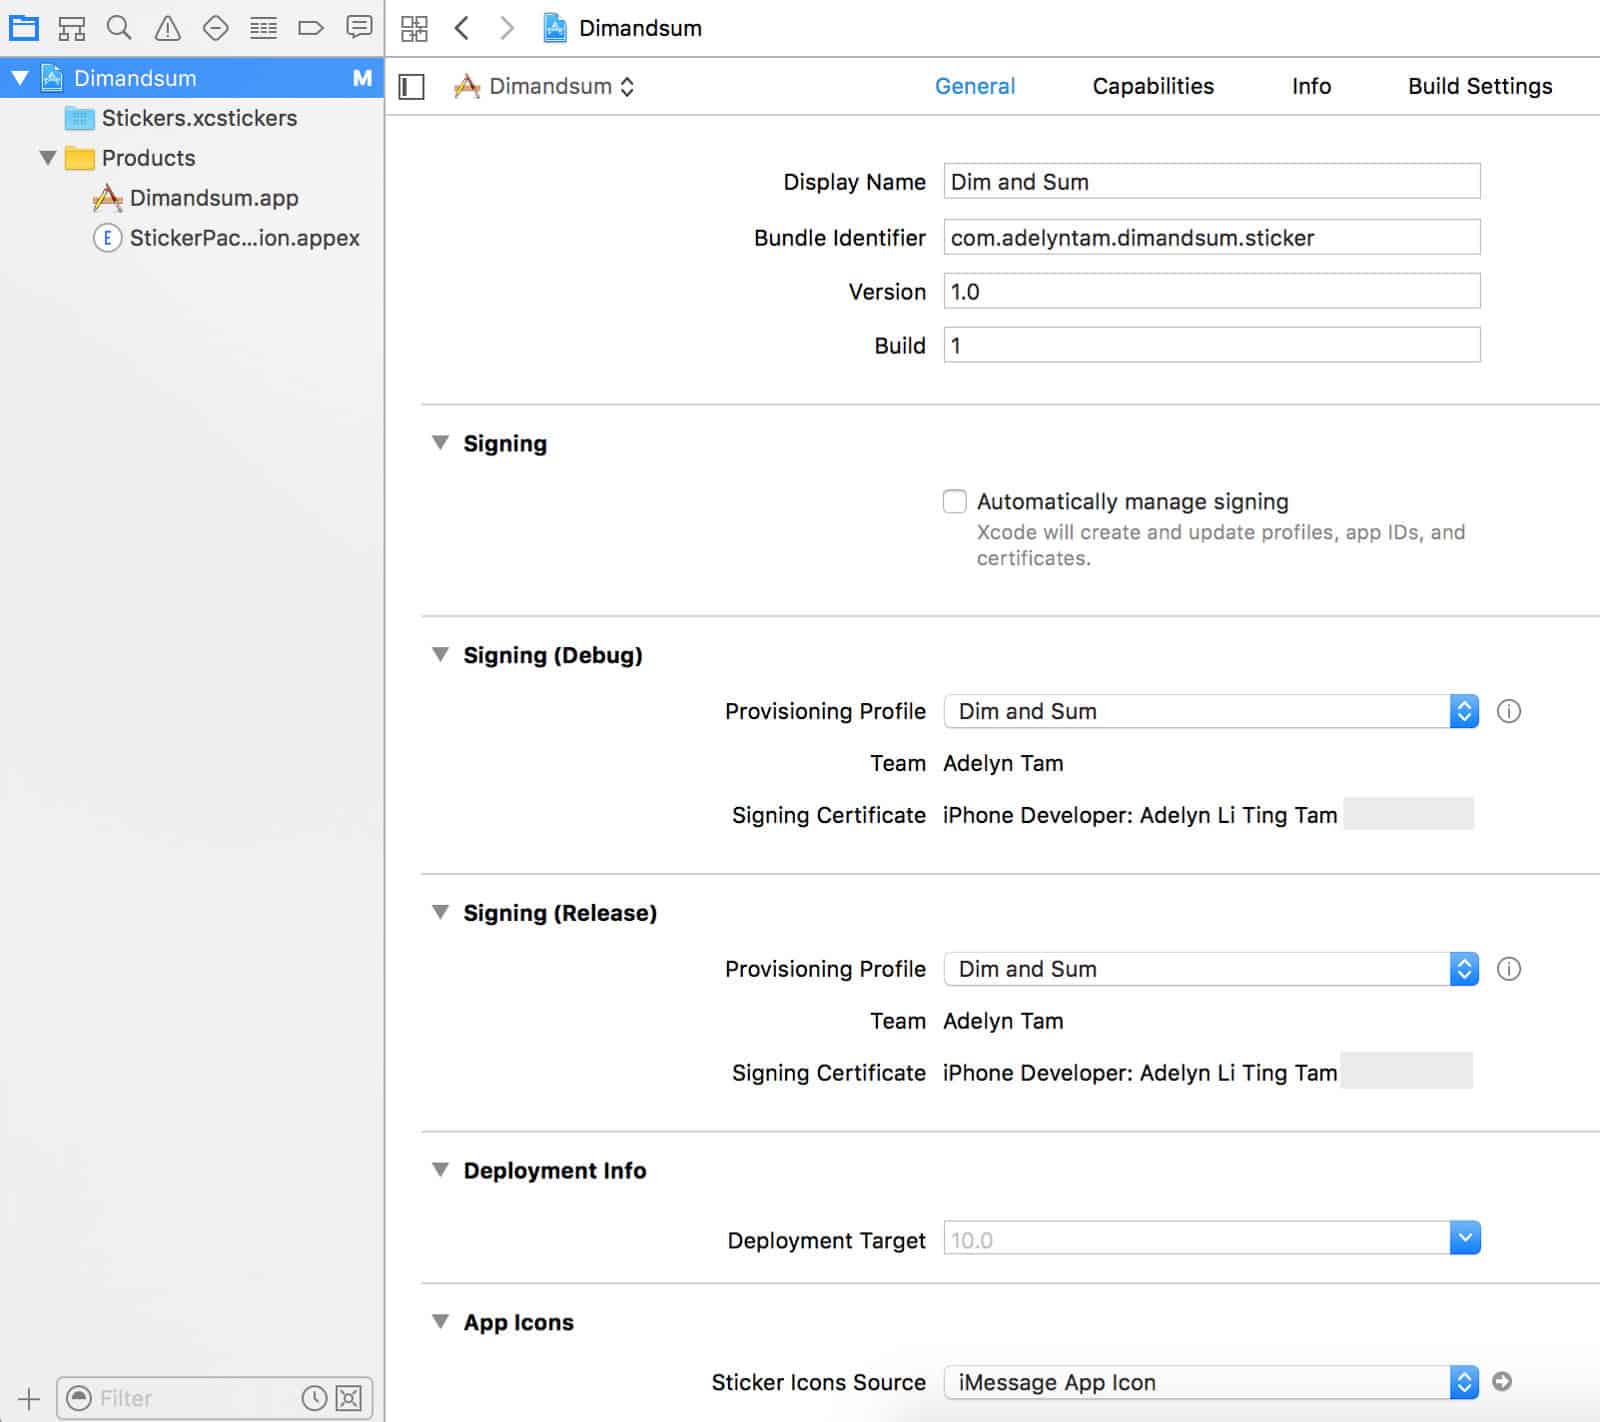
An example of how a Bundle ID is written. It can be anything, as long as it has never been used before, but keep it such that it makes sense to yourself when you read it.
Confirm your details and register. You’re done!
7. Create your provisioning profiles
I’m going to skip explaining the purpose of provisioning profiles, except that you need one to be able to install your stickers or apps on your test devices, and to submit them to the Apple App Store.
There are two provisioning profiles that you will need for your stickers, highlighted below:
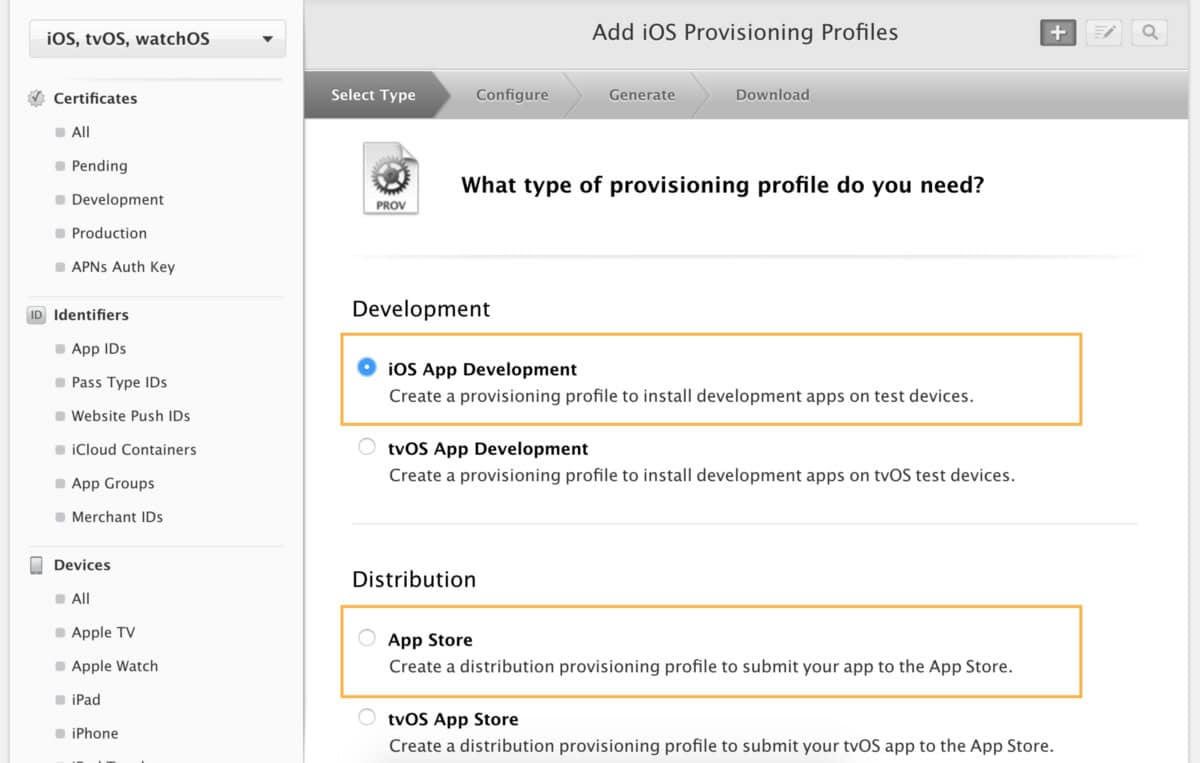
The process for creating the profiles is simple once you have your certificates and App ID set up. Just choose what you’ve created earlier from the dropdown menus when prompted, download, install, and you’re done!
8. Create a new app on iTunes Connect
If you made it this far, we are almost there!
iTunes Connect is what you will use to publish, test, and view analytics of your app. You can find it in your account. I personally found it to be a bit hidden, so here’s a picture:
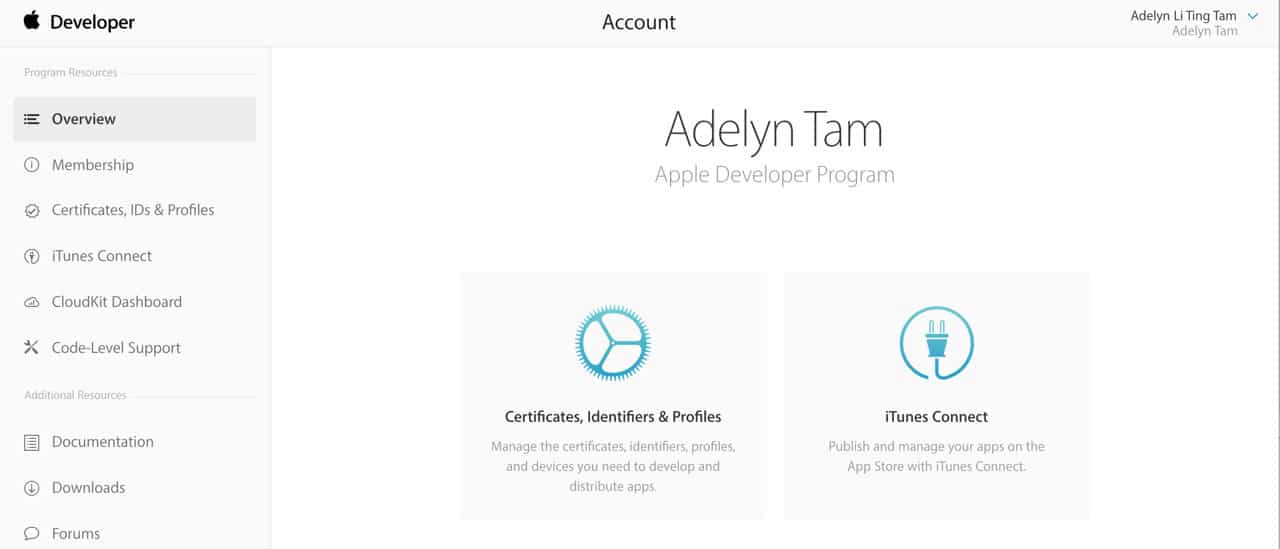
Clicking on iTunes Connect suddenly reveals this whole other world, boom.
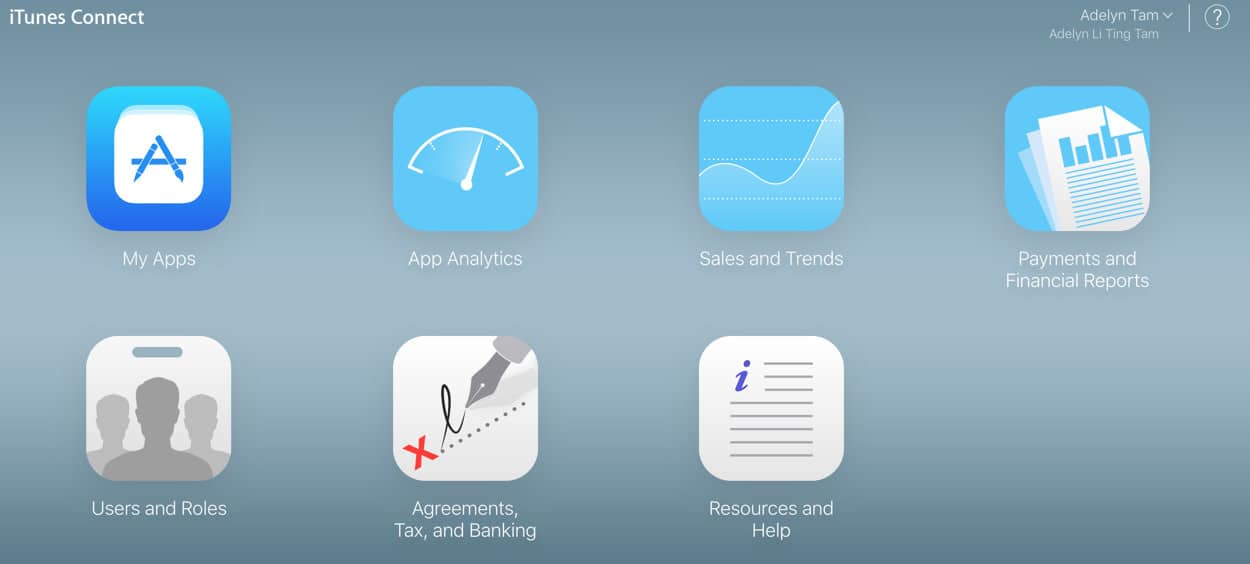
To create a new app, go to My Apps > Click on + > Fill the form. Assuming you have already done the previous steps, you shouldn’t have any problems filling out the form. You should now have created your first app (stickers).
Take some time to familiarize yourself with iTunes Connect. There are two things you should care about here:
Tab 1: App Store
What you have to do here:
Fill up all required information about your stickers (pricing, description, categories etc.) Upload screenshots/artwork of your stickers for the App Store and the iMessage App store.
The dimensions that you need: iPhone 5.5 inch display (1242 x 2208 px), iPad (2048 x 2732 px).
Upload your app icon (1024 x 1024 px)
You will also see the status (preparing for submission, waiting for review, etc) of your app here.
Tab 3: Testflight
Testflight is what you will use if you want to test your stickers with other users. It offers internal testing and external testing options. Internal testing means testing it within your own team with registered users (only specific roles) up to 100 people. External testing allows you to go up to 2000 testers, but you will have to submit your beta for review by Apple before it’s made available to the testers.
9. Configure your sticker file on Xcode
Now that you’ve gotten the set up done on iTunes connect, you will need to set up your sticker file on Xcode.
If you’re not signed into Xcode yet with your Apple ID, go to Preference > Account > Click on + > Sign in.
Go to Project Navigator > Your sticker file. You will see all the fields that you need to fill.
Fill the Bundle Identifier field with the same Bundle ID you created earlier.
Uncheck “Automatically manage signing,” and choose the provisioning profile that you have created earlier.
Mine looks like this:

Now that you have set that up, you will have to edit the information for the extension too, like so:
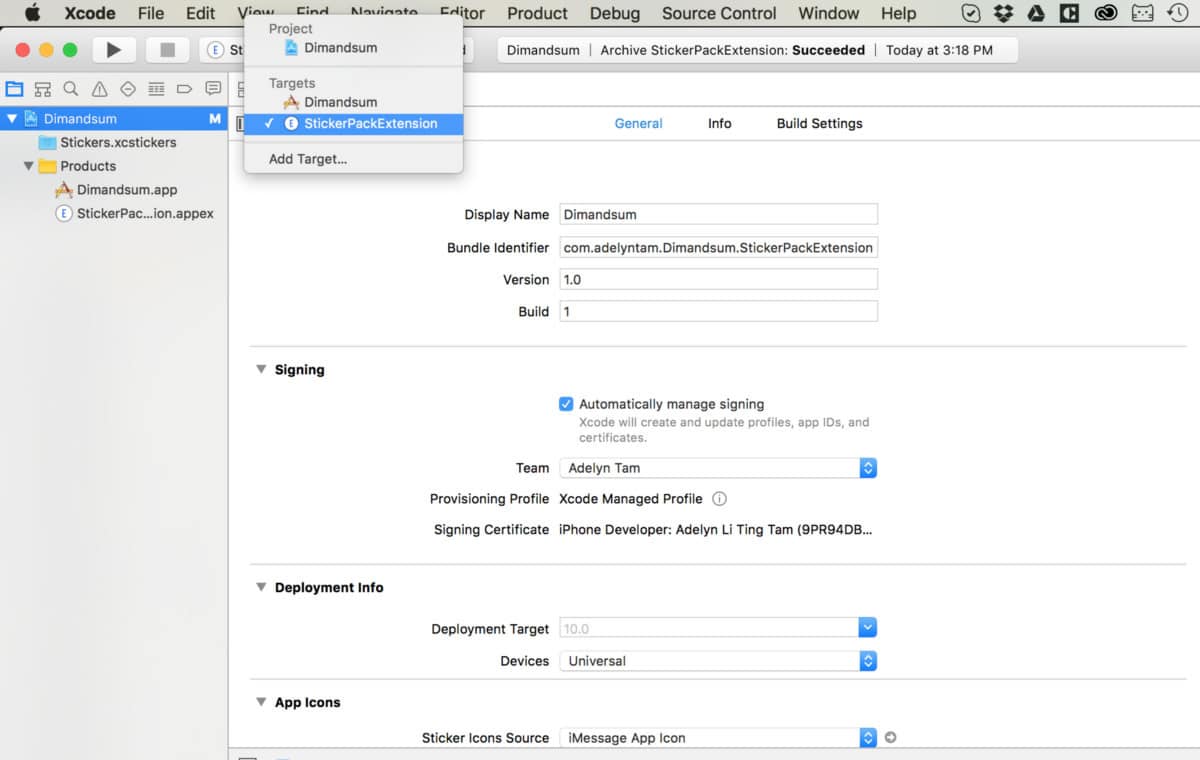
If you haven’t, set the size of your stickers. You can do this any time in the project. Here’s how it looks (on the right panel):

10. Export your build with Xcode
Now let’s finally upload the build to iTunes Connect!
Make sure to select “generic iOS device” under Set the Active Scheme, then Select your .xcstickers folder > go to Product > Archive.
Go to Window > Organizer. A new window should appear and you should see your stickers on the left panel.
Click on Validate to see if all is good with your stickers. If there are issues, Xcode will notify you.
Now assuming all is good with your build, it’s time to upload it to iTunes connect! Click on Upload to App Store… But don’t worry, what it really means is it will upload the stickers iTunes Connect first, where there will be a review process.

Once it’s done uploading, give it some time, and it should appear on your iTunes Connect account.
11. Submitting your stickers to the App Store
On iTunes Connect, you will be able to select the build that you’ve just uploaded for submission.
If you decide to test it before you submit your app, here’s where Testflight will come in. Look through all your details and make sure they are OK, because you can’t change them once your stickers are being reviewed.
Once you’re ready, you can click the submit button.
And that’s it! All you have to do now is to wait for the review process. It was pretty quick for mine, about three days. In the meantime, it’s a good idea to use this waiting time to set up your agreements, tax, and banking details with Apple. There will be some more forms to be filled (yay) but that would be the last of it!
If you made it this far, I thank you and wish you a great journey with your iMessage stickers! It is my hope that other artists, designers, illustrators can get their work out there on different mediums, and have control over their work.
This article was originally published on Medium. Republished with permission.
